一、前言

在Spring Boot开启JdbcTemplate很简单,只需要引入spring-boot-starter-jdbc依赖即可。JdbcTemplate封装了许多SQL操作,具体可查阅官方文档 https://docs.spring.io/spring/docs/current/javadoc-api/org/springframework/jdbc/core/JdbcTemplate.html

二、引入依赖

spring-boot-starter-jdbc:

1
2
3
4
<dependency>
<groupId>org.springframework.boot</groupId>
<artifactId>spring-boot-starter-jdbc</artifactId>
</dependency>

数据库驱动为mysql,数据源采用Druid。具体可参考 《Spring Boot整合MyBatis》

三、代码编写

3.1 数据准备:

1
2
3
4
5
6
7
8
9
10
11
   drop table if exists `student`;
create table `student` (
`sno` int(11) not null auto_increment comment '学号',
`sname` varchar(50) character set utf8 collate utf8_general_ci not null comment '姓名',
`ssex` varchar(2) character set utf8 collate utf8_general_ci not null comment '性别',
primary key (`sno`) using btree
) engine = innodb auto_increment = 1 character set = utf8 collate = utf8_general_ci row_format = dynamic;

insert into `student` values (1, 'KangKang', 'M');
insert into `student` values (2, 'Mike', 'M');
insert into `student` values (3, 'Jane', 'F');

这里主要演示在Dao的实现类里使用JdbcTemplate,所以其它模块代码的编写就不展示了,具体可参考文末的源码。

3.2 Dao层

StudentDao接口代码:

1
2
3
4
5
6
7
8
9
10
11
12
13
@Component
public interface StudentDao {

int add(Student student);

int update(Student student);

int deleteBysno(int sno);

List<Map<String, Object>> queryStudentsListMap();

Student queryStudentBySno(int sno);
}

StudentDaoImpl类代码:

1
2
3
4
5
6
7
8
9
10
11
12
13
14
15
16
17
18
19
20
21
22
23
24
25
26
27
28
29
30
31
32
33
34
35
36
37
38
39
40
41
42
43
44
45
46
47
48
49
50
51
52
@Repository("studentDao")
public class StudentDaoImpl implements StudentDao {

@Autowired
private JdbcTemplate jdbcTemplate;

@Override
public int add(Student student) {
// String sql = "insert into student(sno,sname,ssex) values(?,?,?)";
// Object[] args = { student.getSno(), student.getName(), student.getSex() };
// int[] argTypes = { Types.VARCHAR, Types.VARCHAR, Types.VARCHAR };
// return this.jdbcTemplate.update(sql, args, argTypes);
String sql = "insert into student(sno,sname,ssex) values(:sno,:name,:sex)";
NamedParameterJdbcTemplate npjt = new NamedParameterJdbcTemplate(this.jdbcTemplate.getDataSource());
return npjt.update(sql, new BeanPropertySqlParameterSource(student));
}

@Override
public int update(Student student) {
String sql = "update student set sname = ?,ssex = ? where sno = ?";
Object[] args = { student.getName(), student.getSex(), student.getSno() };
int[] argTypes = { Types.VARCHAR, Types.VARCHAR, Types.VARCHAR };
return this.jdbcTemplate.update(sql, args, argTypes);
}

@Override
public int deleteBysno(int sno) {
String sql = "delete from student where sno = ?";
Object[] args = { sno };
int[] argTypes = { Types.VARCHAR };
return this.jdbcTemplate.update(sql, args, argTypes);
}

@Override
public List<Map<String, Object>> queryStudentsListMap() {
String sql = "select * from student";
return this.jdbcTemplate.queryForList(sql);
}

@Override
public Student queryStudentBySno(int sno) {
String sql = "select * from student where sno = ?";
Object[] args = { sno };
int[] argTypes = { Types.VARCHAR };
List<Student> studentList = this.jdbcTemplate.query(sql, args, argTypes, new StudentMapper());
if (studentList != null && studentList.size() > 0) {
return studentList.get(0);
} else {
return null;
}
}
}

在引入spring-boot-starter-jdbc驱动后,可直接在类中注入JdbcTemplate。由上面代码可发现,对于保存操作有两种不同的方法,当插入的表字段较多的情况下,推荐使用NamedParameterJdbcTemplate。

3.3 Mapper

对于返回结果,可以直接使用List<Map<String, Object>>来接收,这也是个人比较推荐使用的方式,毕竟比较简单方便;也可以使用库表对应的实体对象来接收,不过这时候我们就需要手动创建一个实现了org.springframework.jdbc.core.RowMapper的对象,用于将实体对象属性和库表字段一一对应:

1
2
3
4
5
6
7
8
9
10
public class StudentMapper implements RowMapper<Student> {
@Override
public Student mapRow(ResultSet rs, int rowNum) throws SQLException {
Student student = new Student();
student.setSno(rs.getInt("sno"));
student.setName(rs.getString("sname"));
student.setSex(rs.getString("ssex"));
return student;
}
}

3.4 控制层

TestController:

1
2
3
4
5
6
7
8
9
10
11
12
13
14
15
16
17
18
19
20
21
22
23
24
25
26
@RestController
public class TestController {
@Autowired
private StudentService studentService;

@RequestMapping( value = "/querystudent", method = RequestMethod.GET)
public Student queryStudentBySno(int sno) {
return this.studentService.queryStudentBySno(sno);
}

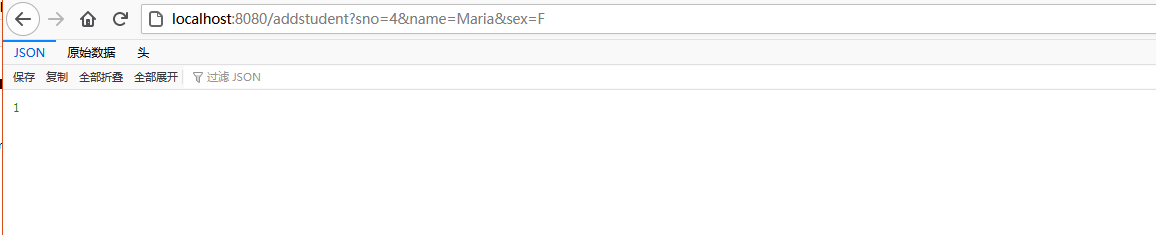
@RequestMapping( value = "/addstudent", method = RequestMethod.GET)
public int addstudent(Student student) {
return this.studentService.add(student);
}

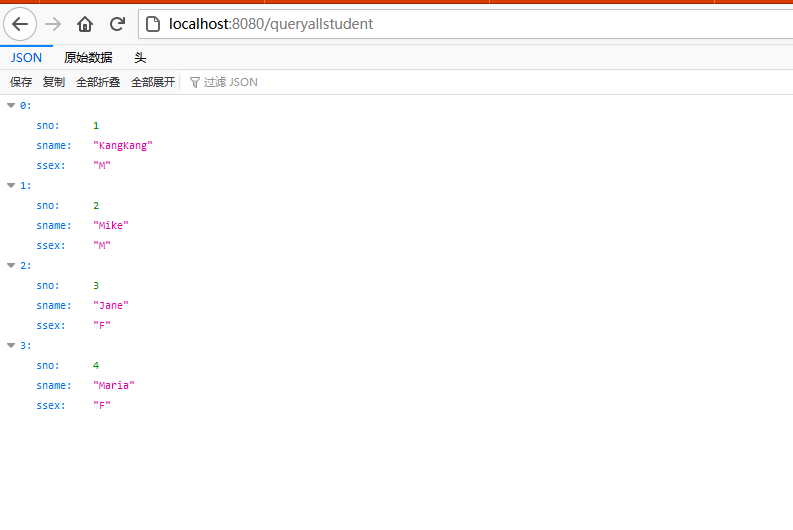
@RequestMapping( value = "/queryallstudent", method = RequestMethod.GET)
public List<Map<String, Object>> queryallstudent() {
return this.studentService.queryStudentsListMap();
}

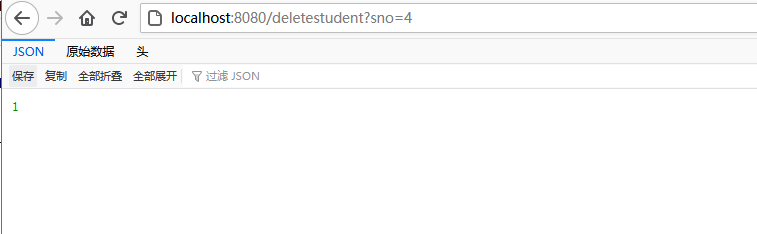
@RequestMapping( value = "/deletestudent", method = RequestMethod.GET)
public int deletestudent(int sno) {
return this.studentService.deleteBysno(sno);
}

}

四、测试

最终项目目录如下图所示

启动项目,测试插入数据 http://localhost:8080/addstudent?sno=4&name=Maria&sex=F

查询所有学生数据 http://localhost:8080/queryallstudent

测试删除 http://localhost:8080/deletestudent?sno=4